

Short answer: Gutters leaking at corners come down to three moves. Find out why water is sitting in the corner, clear the clog or fix the slope that put it there, then strip the old sealant and reseal the miter with a gutter-grade sealant. If the corner is cracked, rusted, or has already failed once after resealing, replace the corner piece instead of sealing it a third time. Ready for quotes? Compare local pros →
In this guide
The trouble is that a drip at the corner looks like a sealant problem, so most people squeeze fresh caulk over the old bead and call it done. It holds for a few weeks, then the leak comes back. Every corner has a seam where two runs of gutter meet, and that seam fails first when water stands in it. Seamless gutters are no exception, because only the long runs are seamless. The corners are still joined by hand.
This guide walks you through the whole job in order: diagnosing the leak, clearing clogs and correcting the pitch, resealing the joint, and deciding when a new corner is the smarter fix. Guardian Gutter Guide is written by a former gutter installer and reviewed by a home inspector, so the steps below are the ones that hold up on a real roofline.
Why gutter corners leak and what to gather first
Gutter corners leak because a corner is the one place where two pieces of gutter meet and depend on a bead of sealant to stay watertight. Once that sealant cracks, or water sits against it for weeks, the seam starts to drip.
A corner leak is usually a symptom of standing water, not just a worn bead of sealant.
How a gutter corner is built
Most corners use one of three designs. A box miter is a preformed corner piece that connects two runs, so it has two seams to seal. A strip miter is a narrow aluminum strip riveted and sealed over an angled joint, and it leans heavily on sealant. A hand-tabbed corner is two pieces bent and joined with small overlapping tabs, which can pull apart as the metal expands and contracts.
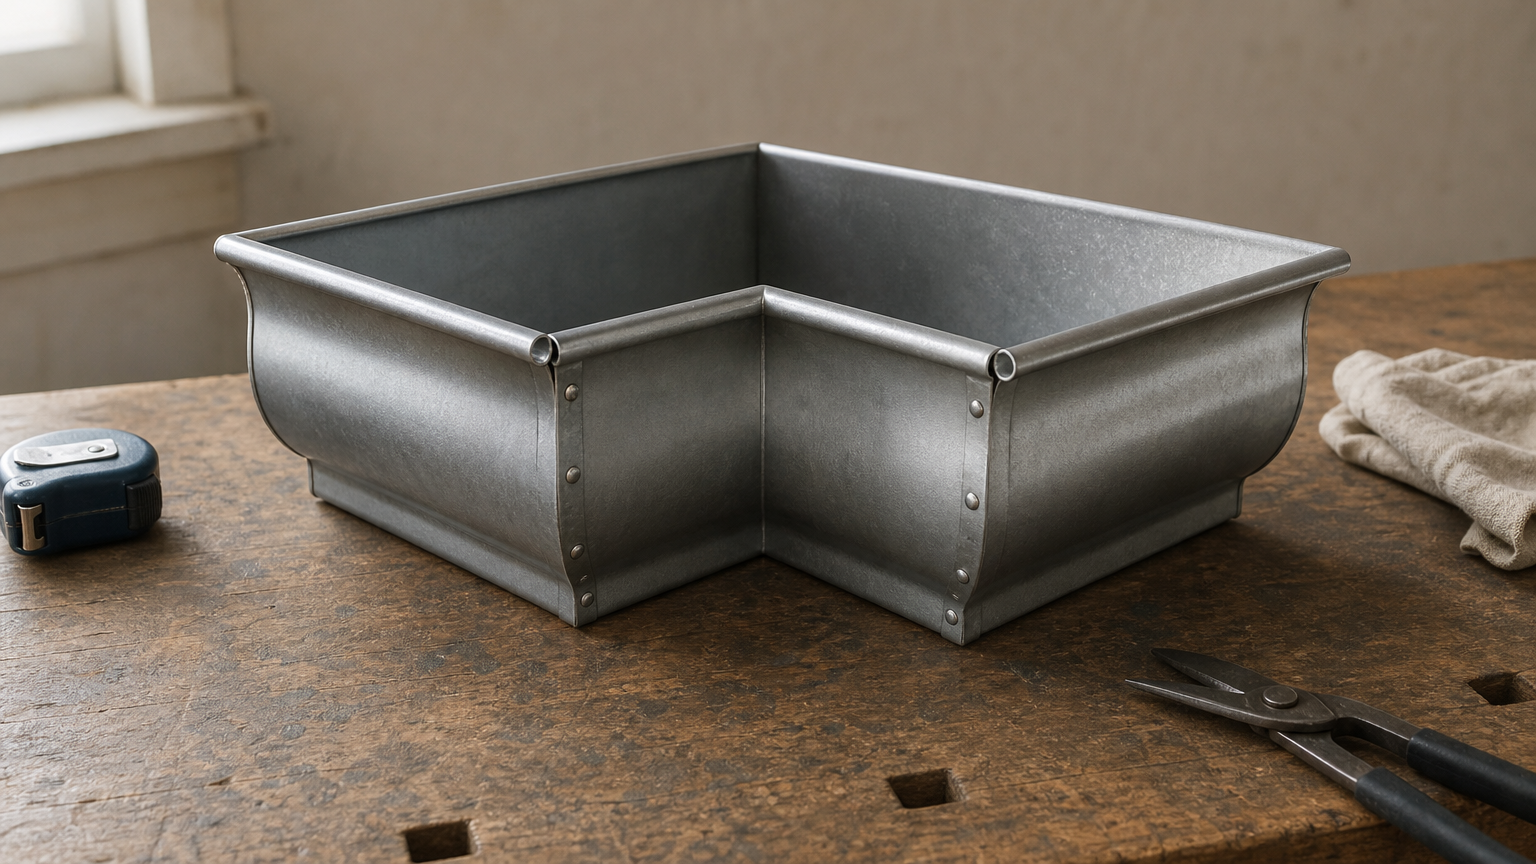
Seamless gutters are formed in one piece along each run. The corners, however, are still joined with rivets and sealant, which is why seamless gutters leaking at corners is such a common complaint.
Why the seam fails first
Aluminum gutters can last for decades, but the sealant at the seams usually wears out sooner. Sun, rain, and the constant expansion and contraction of the metal slowly crack it.
Standing water speeds that up. Debris, a flat spot in the run, or a clogged downspout leaves water sitting against the seam, where it works into hairline cracks. That is why resealing without fixing the cause rarely lasts a season.
What to gather before you climb
You can do this job with basic tools. Collect these before you set up the ladder:
- A ladder with a stabilizer bar, plus gloves and safety glasses
- A garden hose with a spray nozzle
- A putty knife, needle-nose pliers, a wire brush, and an abrasive pad
- A caulk gun and gutter-grade sealant (covered in Step 3)
- A drill and aluminum pop rivets, in case a joint has loosened
- A 4-foot level and tin snips
If the leaking corner is on a second story, hire a pro. A repair is not worth a fall.
What should this cost you?
Answer four questions and get a fair price range for your home.
Step 1. Find out why the corner leaks
Start with a water test before you touch any sealant. Pouring or spraying water through the gutter shows you whether the corner is leaking because of the seam itself or because of something upstream.
Run a water test
Put a helper at the downspout. Run the hose at the high end of the gutter, the end farthest from the downspout, and let water travel along the run toward the corner. Watch the water flow as it reaches the corner. It should move through steadily and exit the downspout without pooling.

Mark the exact leak point with painter’s tape or a pencil. If it drips only when the water is deep, the corner is backing up. If it drips at a trickle, the seam or metal has failed.
Match the symptom to the cause
Use this table to decide where to go next.
| What you see | Likely cause | Go to |
|---|---|---|
| Drips only in heavy rain, downspout barely flowing | Clogged downspout or elbow | Step 2 |
| Water pools in the corner after rain stops | Gutter pitched away from the downspout | Step 2 |
| Inside corner overflows under a roof valley | Too much roof water hitting one spot | Step 2 |
| Dry, cracked, or peeling sealant, leak at any flow | Sealant failure | Step 3 |
| Loose or gapped corner, missing rivets | Joint pulled apart | Step 3 or 4 |
| Rust spots, pinholes, flaking metal | Corrosion | Step 4 |
Fix whatever puts water in the corner first, or the new sealant will fail like the old one did.
Probe for rust and rot
Press a screwdriver tip against the metal around the corner. Solid aluminum or steel stays firm, and pitted or flaking metal means the corner is on its way out. Then test the fascia board behind it. Soft, spongy wood means water has been escaping behind the gutter for a while, and that needs fascia repair before any sealing work.
Step 2. Clear clogs and fix slope
If the water test showed backup, clearing the clog and correcting the pitch solves gutters leaking at corners more reliably than any sealant. Do this before you reseal anything.
Clear the clog
Scoop debris out of the run by hand, working from the corner toward the downspout. Then flush the downspout:
- Hose water into the downspout opening from the top and watch the outlet at the bottom.
- If flow is weak, spray from the bottom up, or feed a plumber’s snake from below.
- Check the elbows. Wet leaves and shingle grit pack in the bends.
- Rerun the hose test from the far end of the gutter.
If the run is long or the home is two stories, hiring a local pro to clean the gutters is a safer call than climbing every few months.
Fix the slope and valley overflow
Gutters should fall about a quarter inch for every 10 feet toward the downspout. Lay a level in the gutter, or watch where the hose water pools, to find flat or reversed sections. Loosen the hanger nearest the low spot, raise or lower the gutter, and re-secure it. Add hangers if the run sags between them, aiming for roughly one every 2 to 3 feet.
Inside corners under a roof valley are a separate problem, because a large share of the roof drains straight into one joint. A splash guard or roof diverter above the corner slows that flow, and a larger downspout moves it out faster. Those fixes keep the new seal from taking a beating every storm.
Step 3. Reseal the miter joint
Once water drains properly, resealing is the right gutter corner leak repair when the metal is sound and only the sealant has failed. Success depends on the sealant you pick and on prep: strip every bit of the old bead, and let the metal dry completely.
Choose the right sealant
Buy a sealant labeled for gutters or for exterior metal. General-purpose acrylic latex caulk shrinks and cracks within a season.
| Sealant | Best for | Watch out for |
|---|---|---|
| Gutter-grade polyurethane or elastomeric sealant | Miter seams, end caps, rivet heads | Needs clean, dry metal. Follow the cure time on the label. |
| 100% exterior silicone rated for metal | Seams on aluminum or steel | Nothing sticks to cured silicone, so later repairs are harder. |
| Roofing cement with a flashing patch | Pinholes and small holes in the trough | Thick and messy. Not meant for seams that flex. |
Never apply new sealant over the old bead. It will not bond, and the leak will return.
Strip, clean, and seal
Pick a dry day with no rain forecast for at least 24 hours, or longer if the label says so. Then work through these steps:
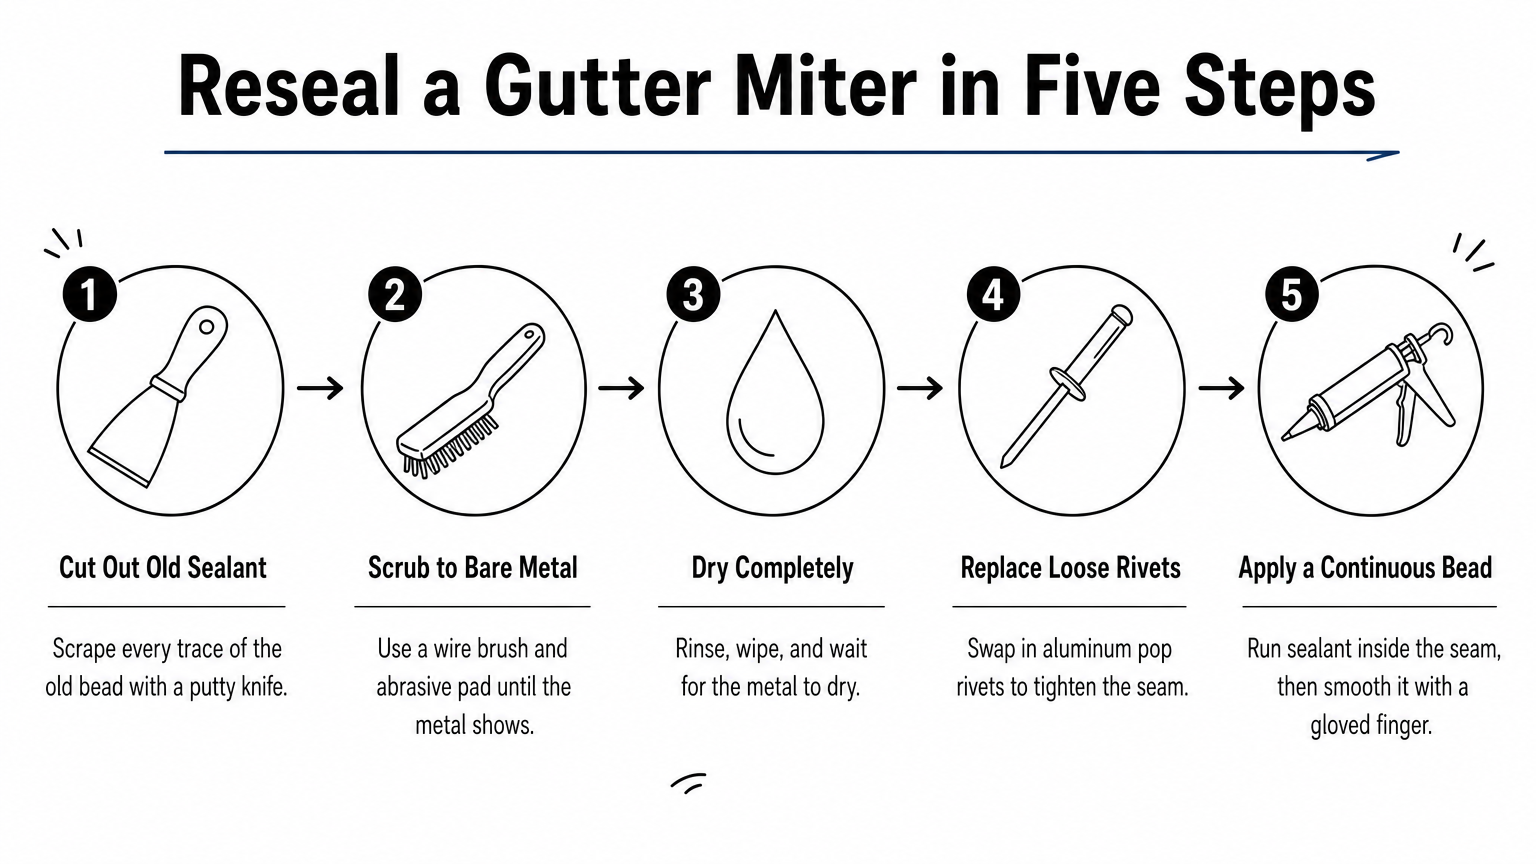
- Cut and scrape away all old sealant with a putty knife and needle-nose pliers.
- Scrub the area with a wire brush, then an abrasive pad, until the bare metal shows.
- Rinse, wipe, and let the metal dry completely.
- Replace any loose rivets with aluminum pop rivets so the seam sits tight.
- Apply a continuous bead inside the seam, pressing it into the gap and over every rivet head, extending an inch past each end of the joint.
- Smooth the bead with a gloved finger so water sheds across it instead of damming behind a ridge.
Let it cure and test
Leave the sealant alone for the full cure time on the label. Then run the hose test again from the far end of the gutter, and watch the corner from the outside and the inside. A dry seam after several minutes of steady flow means the repair worked.
Step 4. Decide whether to replace the corner
Replace the corner when the metal is corroded, the joint is crooked or gapped, or a fresh reseal has already failed once. Sealant cannot fix metal that has stopped bonding, so a second or third bead only buys you weeks.
Signs resealing will not last
Compare your corner against this table.
| Factor | Reseal | Replace the corner |
|---|---|---|
| Metal | Sound, no pitting | Rust, pinholes, flaking |
| Fit | Tight joint, straight cuts | Gap, bend, or crooked miter |
| History | First leak at this corner | Resealed before and it leaked again |
| Age | Younger gutters in good shape | Old metal where sealant will not hold |
If several corners show the same trouble, the whole system may be near the end of its life. Then replacing the whole gutter system costs less over time than repairing one corner after another.
How a corner replacement works
Replacing a corner means cutting out the failed miter and installing a preformed box miter. Cut the gutter back on both sides to clean, undamaged metal. Slide the new corner into place with the correct overlap, fasten it with aluminum rivets, and seal both seams as in Step 3.
A properly fitted box miter and a good bead of sealant should hold for years, as long as the pitch stays right and the run stays clear. Finish by checking nearby hangers and the fascia. If either is damaged, fix them first so the new corner is not hanging on weak support.
Keep the corner dry and the repair holds
Gutters leaking at corners are rarely just a sealant problem. Find the cause with a water test, clear the clog or correct the pitch, strip the old bead completely, and reseal with a gutter-grade product. If the metal is corroded or a repair has failed twice, replace the corner and stop patching it.
Check your corners each spring and fall, and clean the runs often enough that water never sits in a seam. If the leak is up high, the damage has reached the fascia, or you would rather not climb at all, you can get a free gutter repair quote from a local contractor.
What should this cost you?
Answer four questions and get a fair price range for your home.